WAREHOUSE ITEMS
Warehouse items are items that you currently have on the shop floor. These can be for:
- Received Purchase Orders.
- Items purchased in bulk that you draw down from.
Populating Warehouse Items on the fly is best done from the Availability Chart with the ![]() button. Shown below from with the availability chart items, you can apply the stock type, brand, and even finish filters to drill down into the items you require to add in as stock, then click
button. Shown below from with the availability chart items, you can apply the stock type, brand, and even finish filters to drill down into the items you require to add in as stock, then click ![]() under modify column, so that the ID of the records are linked.
under modify column, so that the ID of the records are linked.

Add in your stock items via Warehouse Items
- General>Inventory>Warehouse Items.
- Click
 for the stock item window to open.
 - Select the stock type, brand, and type in the product code, then click in another blank field for the filter options to apply. The listed availability chart items will show, then click this for all other details to populate.
- Add in the quantity you have counted on hand and enter a bay location (where it will be stored) if applicable.

![]() Note: If adding stock item as a material off-cut, you will need to change the Length/Width of the item, as the availability chart will reference the full sheet size.
Note: If adding stock item as a material off-cut, you will need to change the Length/Width of the item, as the availability chart will reference the full sheet size.
- If you want to order items for stock, use Stock as the job number from the Purchase Order screen.
- We also cater for orders not delivered complete and on back order.
- Stock Items can have a bay location, this should be applied when adding the item in as stock on hand via the Warehouse Items.
- To search the Warehouse Items you can use the lower right search field or use the filters.
- Sometimes the storeman is not present and people still need to remove stock. A manual system will allow people to remove stock so that the database can remain accurate for later data entry. The link provided below can be edited and used for such occasions.
Stock Control and CNC Correction Forms can be downloaded and printed for manual purposes. You are free to edit and modify as required.
![]() Note: There isn’t an export .csv option available with Warehouse Items as this would be dangerous deleting items in bulk that have records attached to them.
Note: There isn’t an export .csv option available with Warehouse Items as this would be dangerous deleting items in bulk that have records attached to them.
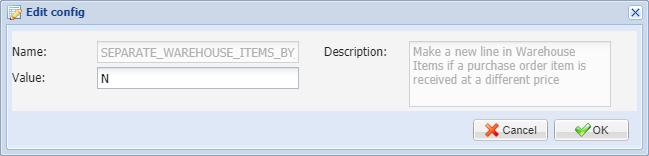
Separating warehouse line items based on price
By default, replenishing stock levels will update the existing stock levels. This behaviour can be overridden to allow for newer stock with a different price to create a separate line item.
A level 5 admin user can activate this functionality by changing the value from N to Y.
Items that have been purchase ordered for a job will appear in your warehouse items assigned to that job. Assign stock items in your warehouse to a job is done through the Raw Materials tab in each Job. When an item is assigned to a job, you will see a picklist button appear when you double click on the item. (See below)

When you click on the picklist button, it will bring up a list of all the items that are assigned to that job. You can then tick off the items that you have removed and it will remove that item from the warehouse. (See below)

Partially Picked Items
The feature of being able to pick a partial quantity of certain items on a job picklist is an option. Simply type in the value for the quantity of the item that a staff member is taking now by using the Picked column, this will only update /remove that updated quantity and leave the remaining balance still to be picked in future. Once the Picked quantity value is updated, click ![]() to apply the update to the job picklist.
to apply the update to the job picklist.

Use the following tablet web browser link to access picklists via a touchscreen: https://companyname.jobman.com.au/touchscreen/touchscreen.
- Search and enter the Job#
- Under General Controls area scroll down to Picklist
- Click on this and the picklist window will open for the associated job

Items that are assigned as Stock or have been updated to Delivered/Fully Received in the pick list window on the supplier purchase order will show ready to be ticked removed on the picklist.
- Tick the check box for the items required to be removed from Warehouse Items to be used on the job
- Click
 to update these records

![]() Note: This list can also be printed and manually ticked off so the warehouse can be updated at a later time.
Note: This list can also be printed and manually ticked off so the warehouse can be updated at a later time.

Amending Stock Levels
- Adding stock back into the warehouse so that records are correct can be done from the Availability Chart item as mentioned previously or editing the Warehouse Item.
- If the warehouse item was removed completely, it can be added again by either the warehouse items or via adding a stock record through availability chart items.
- For leftover materials ordered in for the Job, these can be added in as a new record to Warehouse items or via adding a stock record using the Availability Chart items.
- Removing Stock from the Warehouse for a Job is best done via the Job/Raw Materials and assigning the Stock Item to the Job.
- If you make a change to your Warehouse Items the following box will appear, where you can enter the reason for the change in stock. This may be size, qty or other.

![]() Tip: For board or benchtop material offcuts it’s recommended that a new record is added in Warehouse Items. Apply the availability chart item but make sure to apply the correct length and width of the offcut item.
Tip: For board or benchtop material offcuts it’s recommended that a new record is added in Warehouse Items. Apply the availability chart item but make sure to apply the correct length and width of the offcut item.
These changes can be reported on with the Stock Item Change Log that can be found here https://jobmanacademy.wpengine.com/lessons/reports-2